昨今のウェブサイトではさまざまなクイズが公開されていますよね。そんなクイズですが、JavaScriptを使うと簡単に作ることができます。
質問文と回答の選択肢を用意しておき、画面を切り替える、といった方法もありますが、今回は配列の中にある質問文と回答を取得し、HTMLの中身を動的に切り替えるという仕様のクイズの実装方法をご紹介します。
クイズの要素を配列から取得することで更新がしやすくなり、質問の入れ替えやクイズページの複製などがグッと簡単になります。ぜひ記事を参考にクイズコンテンツを作ってみてください。
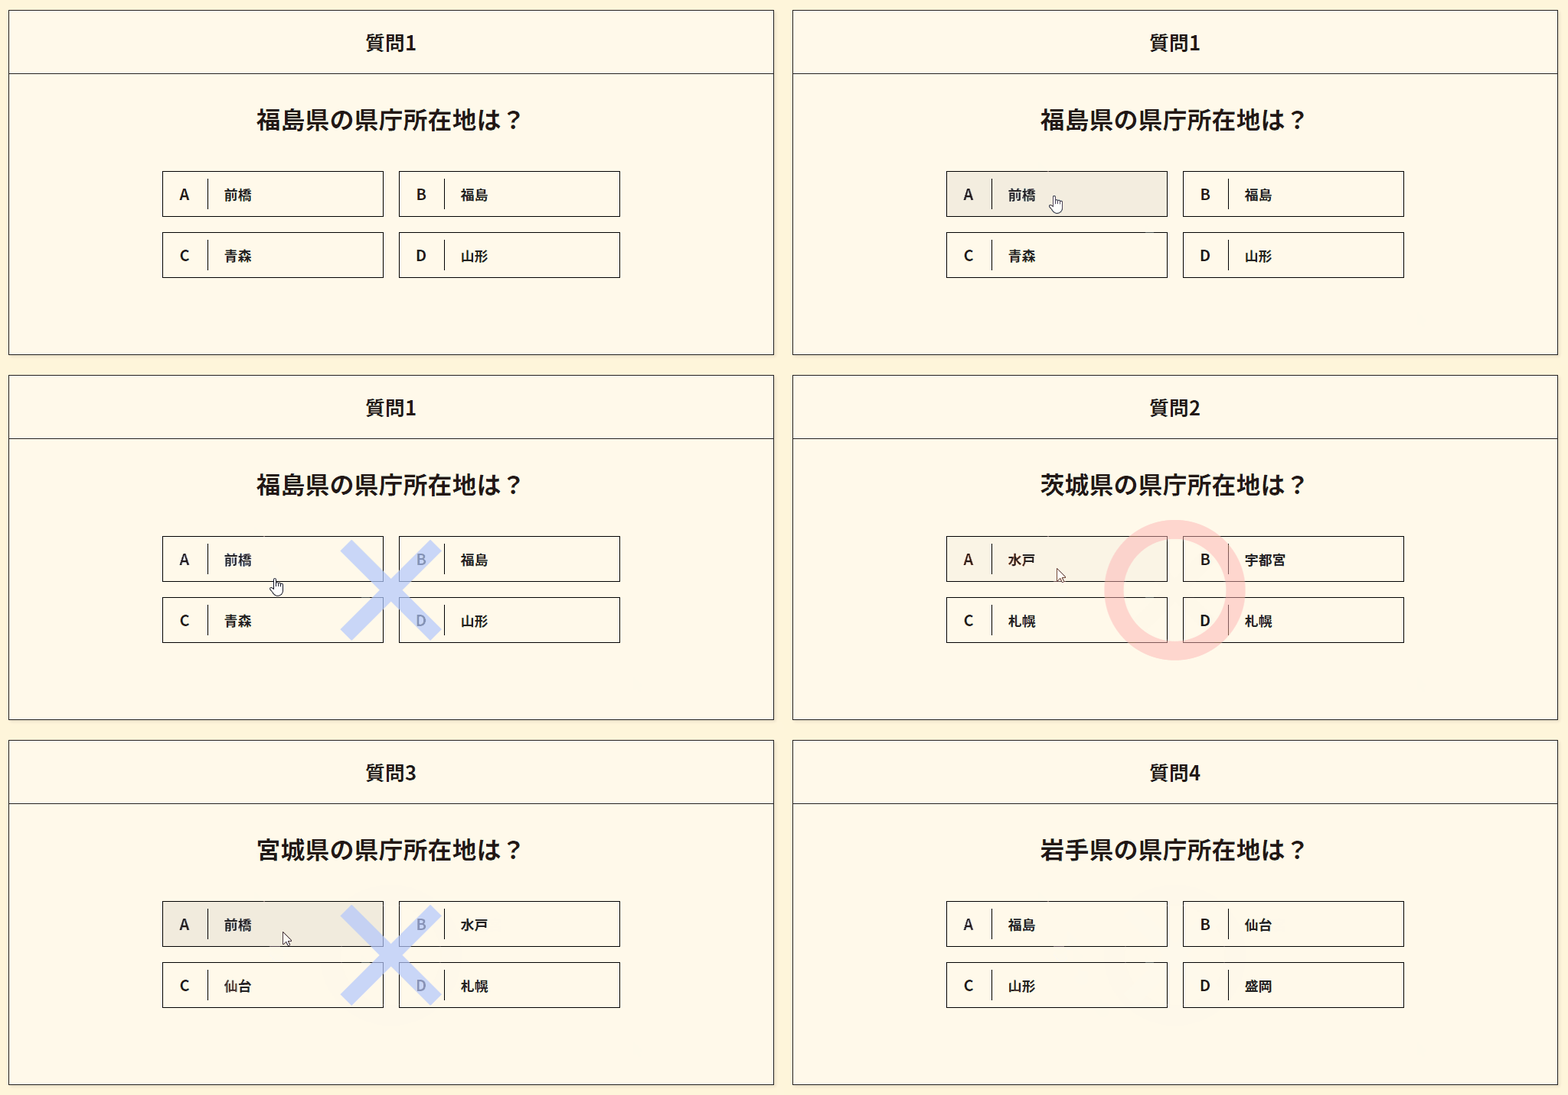
実際の動作はこちらからご確認いただけます。
目次
ファイルの構成
まずは今回のファイル構成です。ベースとなるファイルは以下の通りです。
・index.html
・js/common.js
・js/jquery-3.6.0.min.js
・css/style.css(記事内ではscssを掲載しています)
HTMLを作成
これらの要素を簡単に作っていきます。
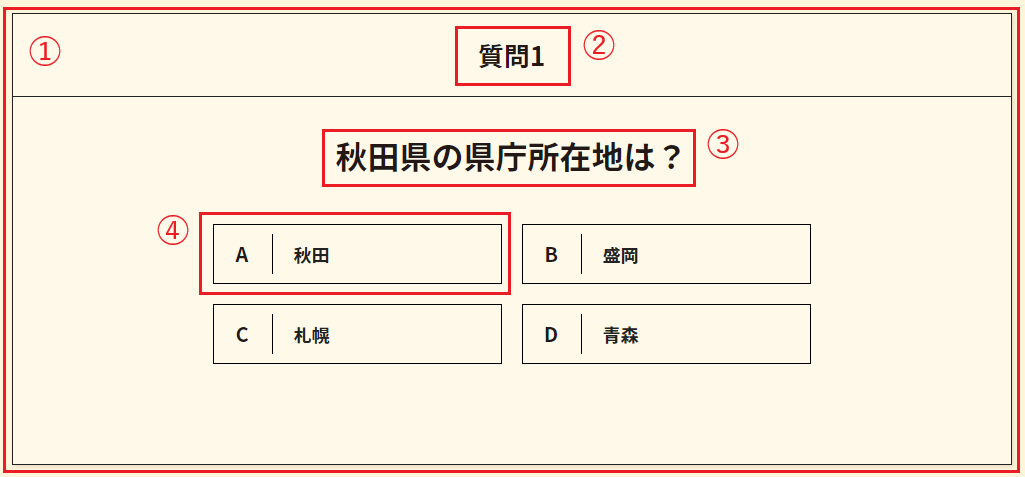
①大枠
1 2 3 4 5 6 7 | <div class="quiz"> <div class="inner-block"> <div class="quiz-content"></div> </div> </div> |
cssで見た目を調整するために大枠を作ります。
クイズの要素は.quiz-content内に書いていきます。
②質問の番号
1 2 3 | <div class="quiz-question-number">質問1</div> |
質問の番号を表示するためのエリアです。
文字はjQueryから動的に出力するので中身は空で大丈夫ですが、今は表示確認用に文字を入れています。
③質問文
1 2 3 | <h2 class="quiz-question">北海道の県庁所在地は?</h2> |
質問文を表示するためのエリアです。
こちらもjQueryから動的に文字を出力するので中身は空で大丈夫ですが、表示確認用に文字を入れています。
④回答
1 2 3 4 5 6 7 8 | <li> <label class="quiz-button button01"> <input name="radio" type="radio" value=""> <span class="quiz-text01">札幌</span> </label> </li> |
回答用のエリアです。
こちらもjQueryから動的に文字を出力するので中身は空で大丈夫ですが、表示確認用に文字を入れています。
今回は4択なので、4つ複製します。
1 2 3 4 5 6 7 8 9 10 11 12 13 14 15 16 17 18 19 20 21 22 23 24 25 26 27 28 29 30 31 32 33 34 35 36 37 | <main class="quiz outer-block"> <div class="inner-block"> <div class="quiz-content"> <div class="quiz-question-number"></div> <h2 class="quiz-question"></h2> <ul class="quiz-answer"> <li> <label class="quiz-button button01"> <input name="radio" type="radio" value=""> <span class="quiz-text01"></span> </label> </li> <li> <label class="quiz-button button02"> <input name="radio" type="radio" value=""> <span class="quiz-text02"></span> </label> </li> <li> <label class="quiz-button button03"> <input name="radio" type="radio" value=""> <span class="quiz-text03"></span> </label> </li> <li> <label class="quiz-button button04"> <input name="radio" type="radio" value=""> <span class="quiz-text04"></span> </label> </li> </ul> </div> </div> </main> |
css(scss)を作成
①大枠
1 2 3 4 5 6 7 8 9 10 11 12 13 14 15 16 17 18 19 20 21 | .inner-block { position: relative; width: calc(100% - 60px); margin: 0 auto; max-width: 1000px; } .quiz { min-height: 100vh; padding: 100px 0; background: #fff5db; } .quiz-content { border: 1px solid #222; background-color: rgba(#fff, 0.4); box-shadow: 2px 2px 4px rgba($color: #000, $alpha: 0.1); position: relative; } |
②質問の番号
1 2 3 4 5 6 7 8 9 | .quiz-question-number { text-align: center; font-size: 26px; font-weight: bold; border-bottom: 1px solid #222; padding: 20px; } |
③質問文
1 2 3 4 5 6 7 8 9 10 11 | .quiz-question { font-size: 32px; font-weight: bold; line-height: 1.8; margin-bottom: 40px; position: relative; text-align: center; padding: 30px 200px 0px; } |
④回答
1 2 3 4 5 6 7 8 9 10 11 12 13 14 15 16 17 18 19 20 21 22 23 24 25 26 27 28 29 30 31 32 | .quiz-answer { display: grid; position: relative; grid-template-columns: repeat(2, 1fr); gap: 20px; padding: 0 200px 100px; li { position: relative; label { color: #222; display: block; margin: 0 auto; height: 60px; display: flex; align-items: center; width: 100%; padding: 4px 20px 4px 80px; font-weight: bold; font-size: 18px; line-height: 1.16; position: relative; transition: 0.3s ease-in-out; border: 1px solid #000; white-space: pre-wrap; &:hover { background-color: rgba(0, 0, 0, 0.1); } } } } |
gridを使い、選択肢を横並びにしています。
選択肢にあるA~Dのアルファベットは疑似要素で出すことにしました。
1 2 3 4 5 6 7 8 9 10 11 12 13 14 15 16 17 18 19 20 21 22 23 24 25 26 27 28 29 30 31 32 33 34 35 36 37 38 | .quiz-answer { li { label { &::after { position: absolute; text-align: center; font-size: 20px; font-weight: bold; content: ""; width: 60px; height: 40px; display: flex; align-items: center; justify-content: center; top: 0; bottom: 0; left: 0; margin: auto; z-index: 1; pointer-events: none; border-right: 1px solid #000; } &:nth-child(1)::after { content: "A"; } &:nth-child(2)::after { content: "B"; } &:nth-child(3)::after { content: "C"; } &:nth-child(4)::after { content: "D"; } } } |
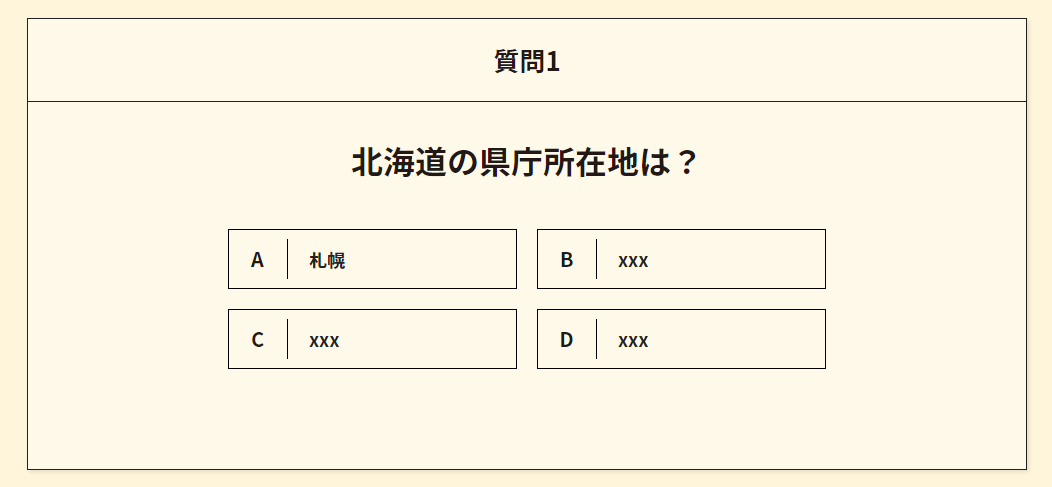
これで静的なサイト作りができました。このような見た目になります。
問題の配列を作成
まずは質問文と選択肢を記載した配列を作ります。common.jsの一番上に書いていきます。
1 2 3 4 5 6 7 8 9 10 11 12 | const prefecturalCapital = [ { id: "01", question: "北海道の県庁所在地は?", answer01: "札幌", answer02: "福島", answer03: "前橋", answer04: "秋田", }, ] |
idには質問の番号、questionには質問文、answer01~04には回答をいれています。
全5問にしたいので、この配列を5個に複製し、質問文と選択肢を適宜入れ替えてください。
また、今回は選択肢をランダムにして出すので、配列と同じ順番で表示されることはありません。
1 2 3 4 5 6 7 8 9 10 11 12 13 14 15 16 17 18 19 20 21 22 23 24 25 26 27 28 29 30 31 32 33 34 35 36 37 38 39 40 41 42 43 44 | const prefecturalCapital = [ { id: "01", question: "北海道の県庁所在地は?", answer01: "札幌", answer02: "福島", answer03: "前橋", answer04: "秋田", }, { id: "02", question: "青森県の県庁所在地は?", answer01: "青森", answer02: "前橋", answer03: "秋田", answer04: "札幌", }, { id: "03", question: "岩手県の県庁所在地は?", answer01: "盛岡", answer02: "福島", answer03: "仙台", answer04: "山形", }, { id: "04", question: "宮城県の県庁所在地は?", answer01: "仙台", answer02: "札幌", answer03: "前橋", answer04: "水戸", }, { id: "05", question: "秋田県の県庁所在地は?", answer01: "秋田", answer02: "盛岡", answer03: "青森", answer04: "札幌", }, ]; |
クイズのシステム部分の作成
ということで、本題のクイズのシステム部分を作っていきます。
ベースはこのようになります。
1 2 3 4 5 6 7 8 9 10 11 12 13 14 15 16 17 18 19 20 21 22 23 24 | let questionObject = (function () { let Obj = function ($target) { this.init(); }; Obj.prototype = { //初回設定 init: function () { //イベント登録 this.event(); }, event: function () { //ここにやりたいことを書く return false; }, }; return Obj; })(); let quiz= $('.quiz'); //クイズの大枠のクラスを登録 if (quiz[0]) { let queInstance = new questionObject(quiz); } |
質問番号や質問文、選択肢ボタンなど、クイズに必要な要素を変数に入れておきます。
以下の$targetは、先ほど値を渡した $(‘.quiz’) になります。
1 2 3 4 5 6 7 8 9 10 11 12 13 14 15 16 17 18 19 20 | //質問の番号 this.$questionNumber = $target.find('.quiz-question-number'); //質問の番号 this.$questionName = $target.find('.quiz-question'); //選択肢ボタン this.$questionButton = $target.find('.quiz-button'); this.$button01 = $target.find('.button01'); this.$button02 = $target.find('.button02'); this.$button03 = $target.find('.button03'); this.$button04 = $target.find('.button04'); //選択肢のテキスト this.$answer01 = $target.find('.quiz-text01'); this.$answer02 = $target.find('.quiz-text02'); this.$answer03 = $target.find('.quiz-text03'); this.$answer04 = $target.find('.quiz-text04'); |
現在の質問数も用意しておきます。最初は1番目の質問ですが、JavaScriptの1は0にあたるので0を挿入しておきます。
1 2 3 | let $currentNum = 0; |
問題数の合計も用意します。問題数が変わった際は、ここの中身の数字を変更するだけでよいです。
1 2 3 | let $questionTotalNum = 5; //今回は全5問 |
1問あたりの得点用の変数も用意しました。
1 2 3 | let $pointPerCorrect = 10; //今回は1問あたり10点 |
これで、最低限の下準備が整いました。
1 2 3 4 5 6 7 8 9 10 11 12 13 14 15 16 17 18 19 20 21 22 23 24 25 26 27 28 29 30 31 32 33 34 35 36 37 38 39 40 41 42 43 44 45 46 47 48 49 50 51 52 53 54 55 56 57 58 59 60 61 62 | (function ($) { 'use strict'; //合計問題数 let $questionTotalNum = 5; const prefecturalCapital = [ //配列の中身は先ほど紹介したものと同じなので省略 ]; //現在の質問数 let $currentNum = 0 //得点 let $pointPerCorrect = 10; let questionObject = (function () { let Obj = function ($target) { //質問の番号 this.$questionNumber = $target.find('.quiz-question-number'); //質問文 this.$questionName = $target.find('.quiz-question'); //選択肢ボタン this.$questionButton = $target.find('.quiz-button'); this.$button01 = $target.find('.button01'); this.$button02 = $target.find('.button02'); this.$button03 = $target.find('.button03'); this.$button04 = $target.find('.button04'); //選択肢のテキスト this.$answer01 = $target.find('.quiz-text01'); this.$answer02 = $target.find('.quiz-text02'); this.$answer03 = $target.find('.quiz-text03'); this.$answer04 = $target.find('.quiz-text04'); this.init(); }; Obj.prototype = { //初回設定 init: function () { //イベント登録 this.event(); }, event: function () { //ここにやりたいことを書く return false; }); }, }; return Obj; })(); let quiz = $('.quiz'); if (quiz[0]) { let queInstance = new questionObject(quiz); } })(jQuery); |
質問をランダムにする
まずは質問の出題順をランダムにする準備をおこないます。
クイズのID(1~5)が入った配列quizIdの中身をランダムに入れ替え、ランダムになった数字を一つ目から呼び出す、ということをします。
数字の入れ替えについては、こちらの記事のソースをベースとして使わせてもらっています。
配列の要素の並びをシャッフルする
1 2 3 4 5 6 7 8 9 10 11 12 13 14 | //質問をランダムにする function shuffleQuiz(array) { for (let i = (array.length - 1); 0 < i; i--) { let random = Math.floor(Math.random() * (i + 1)); let selected = array[i]; array[i] = array[random]; array[random] = selected; } return array; } let quizId = ["01", "02", "03", "04", "05"]; shuffleQuiz(quizId); |
次の質問を取得
次の質問を取得する関数を作成します。選択肢のボタンをクリックした際、nextQuestion を定義し、その中の関数 searchQuestion に値 value を渡しています。
この値 value はソースの「//次の質問番号を取得」の下で、先ほどの「質問をランダムにする」でシャッフルしたidの $currentNum 番目(つまり先ほど定義した0)から+1された数字が入るようになっています。要するに、配列 quizId の2番目の数字が呼び出されます。
その下に書かれている関数 searchQuestion では配列 prefecturalCapital から$currentNum 番目と同じ数字(id)の質問を探し出す、ということをしています。
1 2 3 4 5 6 7 8 9 10 11 12 13 14 15 16 17 18 19 20 21 22 23 24 25 26 27 28 29 | event: function () { let _this = this; this.$questionButton.on("click", function () { //現在の数字の更新 $currentNum = $currentNum + 1; //次の質問番号を取得 let value = quizId[$currentNum]; //次の質問を取得 let nextQuestion = _this.searchQuestion(value); return false; }); searchQuestion: function (questionId) { let nextQuestion = null; prefecturalCapital.forEach(function (item) { if (item.id == questionId) { nextQuestion = item; } }); return nextQuestion; }, }, |
次の質問に切り替える
次の質問に切り替える部分を作っていきます。
ちょっと長いので、最初に全体ソースを記載します。
1 2 3 4 5 6 7 8 9 10 11 12 13 14 15 16 17 18 19 20 21 22 23 24 25 26 27 28 29 30 | event: function () { let _this = this; this.$questionButton.on("click", function () { //次の質問の内容に切り替える _this.changeQuestion(nextQuestion); return false; }); changeQuestion: function (nextQuestion) { let _this = this; //質問番号を1つ増やす let numPlusOne = $currentNum + 1; _this.$questionNumber.text('質問' + numPlusOne); //質問文の入れ替え _this.$questionName.text(nextQuestion.question + 'の県庁所在地は?'); //選択肢のテキストの入れ替え _this.$answer01.text(nextQuestion.answer01); _this.$answer02.text(nextQuestion.answer02); _this.$answer03.text(nextQuestion.answer03); _this.$answer04.text(nextQuestion.answer04); }, }, |
まず最初に変数 _this の中に this をいれています。
1 2 3 | let _this = this; |
続いて、選択肢のボタンをクリックした際、changeQuestionという関数を呼び出します。
値で渡している nextQuestion は先ほどの「次の質問を取得」で定義したもの(つまりシャッフルしたidの $currentNum 番目のid)です。
シャッフルしたidの $currentNum 番目のid が仮に「05」だったとした場合、配列 prefecturalCapital の id:05 のデータを呼び出しています。
例:idが05だった場合に参照されるもの
1 2 3 4 5 6 7 8 9 10 11 12 | const prefecturalCapital = [ { id: "05", question: "秋田県の県庁所在地は?", answer01: "秋田", answer02: "盛岡", answer03: "青森", answer04: "札幌", }, ] |
「クイズのシステム部分の作成」で定義した変数に入れていきます。
先ほど参照した nextQuestion の質問文と選択肢のテキストを取得し、 text() を利用して差し替えます。
1 2 3 4 5 6 7 8 9 10 | //質問文の入れ替え _this.$questionName.text(nextQuestion.question); //選択肢のテキストの入れ替え _this.$answer01.text(nextQuestion.answer01); _this.$answer02.text(nextQuestion.answer02); _this.$answer03.text(nextQuestion.answer03); _this.$answer04.text(nextQuestion.answer04); |
質問の型が決まっている場合、以下のように型をテキストで出すようにここで記載すると、質問の配列を少しだけ簡略化することができます。
1 2 3 | _this.$questionName.text(nextQuestion.question + 'の県庁所在地は?'); |
1 2 3 4 5 6 7 | const prefecturalCapital = [ { question: "北海道", }, ] |
上記のように書くと、実際には「北海道の県庁所在地は?」と表示されます。
また、「質問1」を「質問2」などに増やしていきたいので、$currentNum に +1 をし、 text() で入れ替えます。
1 2 3 4 5 | //質問番号を1つ増やす let numPlusOne = $currentNum + 1; _this.$questionNumber.text('質問' + numPlusOne); |
以上までが「次の質問に切り替える」の関数になります。
選択肢をクリックした要素の得点に応じて正解/不正解を表示する
クリックした要素に .button01 というクラスがついている場合「正解」にする、という実装をおこないます。
1 2 3 4 5 6 7 8 9 10 11 12 13 14 | this.$questionButton.on("click", function () { if ($(this).hasClass('button01')) { $(this).parents('.quiz-answer').addClass('is-correct'); score = score + $pointPerCorrect; } else { $(this).parents('.quiz-answer').addClass('is-incorrect'); } $(this).addClass('is-checked'); return false; }) |
選択肢のボタンをクリックした際、ボタンのクラスが .button01 だった場合、選択肢が入っているul(.quiz-answer)に is-correct というクラスを追加します。
その次の行で score に $pointPerCorrect(今回は10) を足していますが、この score は最終画面で「50点満点のうち xx点」という形でユーザーの結果発表時に使用しようと思います。
ボタンに .button01 というクラスがついていなかった場合、 is-incorrect というクラスを追加しています。
jQueryで追加したクラスの scss を用意します。
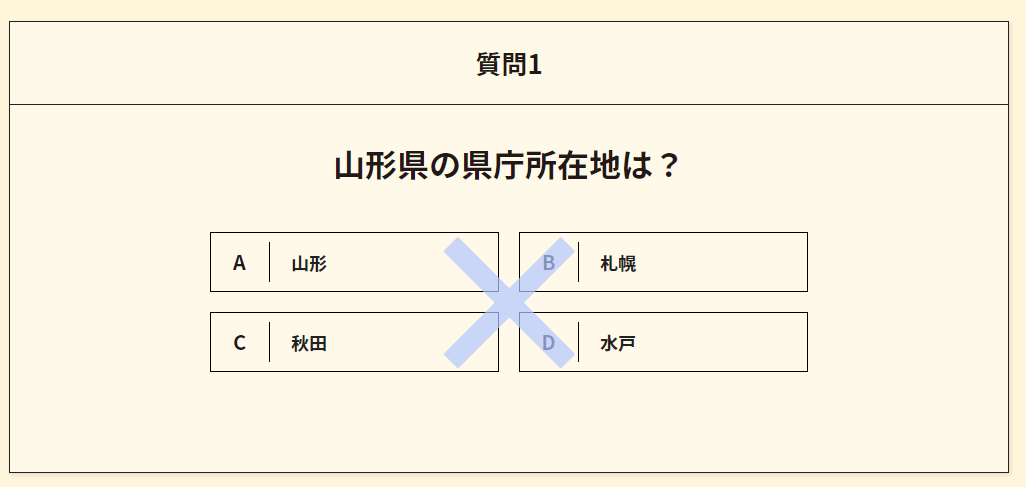
200px四方の疑似要素を用意しておき、.is-correct がついた場合は赤の「〇」、.is-incorrect がついた場合は青の「×」が表示されるようにします。
1 2 3 4 5 6 7 8 9 10 11 12 13 14 15 16 17 18 19 20 21 22 23 24 25 26 27 28 29 30 31 32 33 34 35 36 37 38 39 40 | .quiz-answer { position: relative; &::before { position: absolute; width: 200px; height: 200px; font-size: 200px; opacity: 0.7; top: -40px; left: 0; right: 0; margin: auto; font-weight: bold; line-height: 1; text-align: center; z-index: 2; pointer-events: none; } &.is-correct { .checked { background: #ffb3b3; } &::before { content: "〇"; color: #ffb3b3; opacity: 0.5; } } &.is-incorrect { .checked { background: #b3c7ff; } &::before { content: "×"; color: #b3c7ff; } } } |
このような見た目で調整しました。
〇だった場合(.is-correct)

×だった場合(.is-incorrect)
正解/不正解を表示した1秒後に次の質問を取得
続いて、これまでに作った「次の質問を取得」と「次の質問に切り替える」を setTimeout の中に入れ、選択肢のボタンを押した1秒後に質問が切り替わる、というようにします。
1 2 3 4 5 6 7 8 9 10 11 12 13 14 15 16 17 18 19 20 21 22 23 24 25 | this.$questionButton.on("click", function () { setTimeout(function () { //こちら追加 //現在の数字の更新 $currentNum = $currentNum + 1; //次の質問番号を取得 let value = quizId[$currentNum]; //次の質問を取得 let nextQuestion = _this.searchQuestion(value); //次の質問の内容に切り替える _this.changeQuestion(nextQuestion); //クラスを取る $('.quiz-answer').removeClass('is-correct').removeClass('is-incorrect'); }, 1000); //こちら追加 1000 = 1秒 return false; }) |
その際に、「選択肢をクリックした要素の得点に応じて正解/不正解を表示する」で追加したクラス(.is-correct/.is-incorrect)はクラスを削除するようにします。〇か×が1秒表示されて消えるイメージです。
1 2 3 4 | //クラスを取る $('.quiz-answer').removeClass('is-correct').removeClass('is-incorrect'); |
選択肢を押した1秒間はボタンをクリックできないようにする
〇×表示中に次の質問を呼び出さないよう、「正解/不正解を表示した1秒後に次の質問を取得」で追加した setTimeout を利用して、「選択肢を押した1秒間はボタンをクリックできないようにする」というようにします。
1 2 3 4 5 6 7 8 9 10 11 12 13 14 15 | this.$questionButton.on("click", function () { $(this).addClass('is-checked'); setTimeout(function () { //クラスを取る _this.$questionButton.removeClass('is-checked'); }, 1000); return false; }) |
scss で .is-checked がついているときはクリック・タップを無効化します。
1 2 3 4 5 6 7 8 9 10 11 | .quiz-answer { li { label { &.is-checked { pointer-events: none; } } } } |
ウインドウの読み込み時、質問を取得する
このままでは最初に表示する質問を取得できていない(index.htmlに書かれていた場合、そのまま表示される)ため、1番目の質問を取得します。
これまでに作成した関数を利用し、quizId の配列から取得されるものを最初に宣言した0( $currentNum = 0 )番目とすると、1番目の質問を取得します。
1 2 3 4 5 6 7 8 9 10 11 12 13 14 15 16 17 | event: function () { //ウインドウ読み込み時 $(window).on('load', function () { //value取得 let value = quizId[$currentNum]; //最初は0(1番目) //次の質問を取得 let nextQuestion = _this.searchQuestion(value); //次の質問に切り替える _this.changeQuestion(nextQuestion); } }, |
これで、ウインドウが読み込まれた際に1番目の質問に切り替わるようになります。
選択肢をランダムにする
選択肢をランダムにします。
1 2 3 4 5 6 7 8 9 10 11 12 13 14 15 16 17 18 19 20 21 22 23 24 25 26 | event: function () { //ウインドウ読み込み時 $(window).on('load', function () { //回答のシャッフル _this.shuffleAnswer($('.quiz-answer')); } //button クリック this.$questionButton.on("click", function () { setTimeout(function () { //回答のシャッフル _this.shuffleAnswer($('.quiz-answer')); }, 1000); } }, shuffleAnswer: function (container) { let content = container.find("> *"); let total = content.length; content.each(function () { content.eq(Math.floor(Math.random() * total)).prependTo(container); }); }, |
shuffleAnswer の箇所はこちらのブログのソースを使用させていただいています。
jQueryで要素をシャッフル。
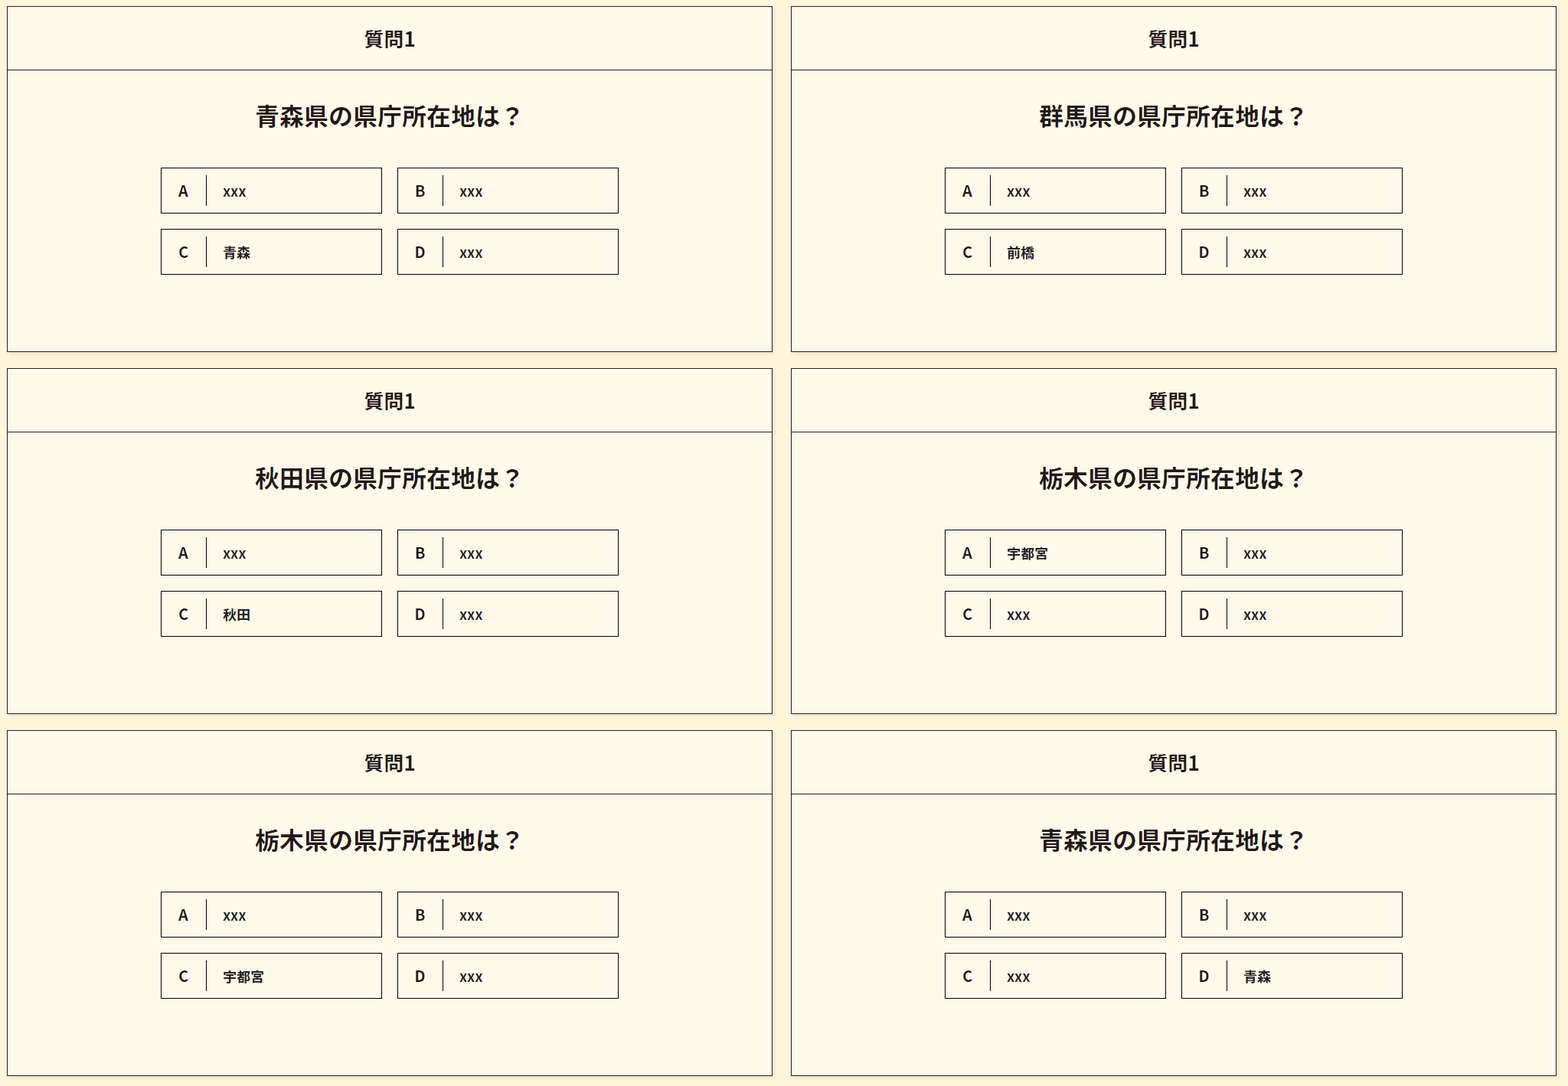
このように、選択肢の順番がランダムになります。
5問目まで答えた際、合計点と戻るボタンを表示する
5問目まで答えた際、合計点と戻るボタンを表示しようと思います。
新たに追加するエリアなので、まずは .quiz-content の最上部にHTMLを書きます。
1 2 3 4 5 6 7 8 9 10 11 12 | <div class="quiz-content"> <div class="finish"> <div class="score-wrap"> <span class="score">0</span> <span class="ja">点</span> <span class="full">/50点</span> </div> <a href="/" class="goback-button">最初からやり直す</a> </div> </div> |
1 2 3 4 5 6 7 8 9 10 11 12 13 14 15 16 17 18 19 20 21 22 23 24 25 26 27 28 29 30 31 32 33 34 35 36 37 38 39 | .finish { display: none; text-align: center; position: absolute; width: 100%; height: 100%; top: 0; left: 0; align-items: center; justify-content: center; flex-direction: column; background-color: rgba($color: #000000, $alpha: 0.6); z-index: 3; &.is-show { display: flex; } .score-wrap { text-align: center; color: #fff; .score { font-size: 80px; font-weight: bold; } .ja { font-size: 34px; } .full { font-size: 24px; } } .goback-button { font-size: 14px; color: #fff; margin-top: 30px; display: inline-block; } } |
.finish というエリアを追加し、.is-show というクラスがついたら表示するようにしました。
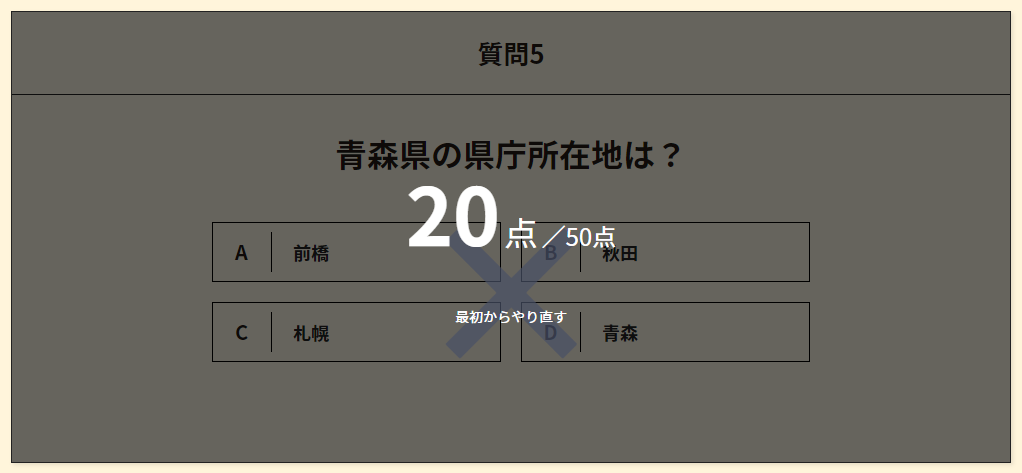
HTML を作ったので、jQueryで呼び出しやすいよう変数に入れておきます。
$currentNum が$questionTotalNum(今回は5)になった際に .finish に .is-show というクラスを追加するようにします。
また、点数用のエリア .score-wrap .score のテキストを合計点(正解だった場合 +10 していったもの)に差し替えます。
1 2 3 4 5 6 7 8 9 10 11 12 13 14 15 16 17 18 19 20 21 | let questionObject = (function () { let Obj = function ($target) { //score this.$score = $target.find('.score-wrap .score'); //追加 }; })(); Obj.prototype = { event: function () { //button クリック this.$questionButton.on("click", function () { if ($currentNum + 1 == $questionTotalNum) { //現在の数字が5になったら $('.finish').addClass('is-show'); $('.score-wrap .score').text(score); } else { //これまで作成したもの } }); } |
作っている途中でエリアを足したりしましたが、これでクイズコンテンツが完成しました。
全体のソース
1 2 3 4 5 6 7 8 9 10 11 12 13 14 15 16 17 18 19 20 21 22 23 24 25 26 27 28 29 30 31 32 33 34 35 36 37 38 39 40 41 42 43 44 45 46 47 48 | <main class="quiz"> <div class="inner-block"> <div class="quiz-content"> <div class="finish"> <div class="score-wrap"> <span class="score">0</span> <span class="ja">点</span> <span class="full">/50点</span> </div> <a href="/" class="goback-button">最初からやり直す</a> </div> <div class="quiz-question-number"></div> <h2 class="quiz-question"></h2> <ul class="quiz-answer"> <li> <label class="quiz-button button01"> <input name="radio" type="radio" value=""> <span class="quiz-text01"></span> </label> </li> <li> <label class="quiz-button button02"> <input name="radio" type="radio" value=""> <span class="quiz-text02"></span> </label> </li> <li> <label class="quiz-button button03"> <input name="radio" type="radio" value=""> <span class="quiz-text03"></span> </label> </li> <li> <label class="quiz-button button04"> <input name="radio" type="radio" value=""> <span class="quiz-text04"></span> </label> </li> </ul> </div> </div> </main> |
1 2 3 4 5 6 7 8 9 10 11 12 13 14 15 16 17 18 19 20 21 22 23 24 25 26 27 28 29 30 31 32 33 34 35 36 37 38 39 40 41 42 43 44 45 46 47 48 49 50 51 52 53 54 55 56 57 58 59 60 61 62 63 64 65 66 67 68 69 70 71 72 73 74 75 76 77 78 79 80 81 82 83 84 85 86 87 88 89 90 91 92 93 94 95 96 97 98 99 100 101 102 103 104 105 106 107 108 109 110 111 112 113 114 115 116 117 118 119 120 121 122 123 124 125 126 127 128 129 130 131 132 133 134 135 136 137 138 139 140 141 142 143 144 145 146 147 148 149 150 151 152 153 154 155 156 157 158 159 160 161 162 163 164 165 166 167 168 169 170 171 | .quiz { min-height: 100vh; padding: 100px 0; background: #fff5db; } .quiz-content { border: 1px solid #222; background-color: rgba(#fff, 0.4); box-shadow: 2px 2px 4px rgba($color: #000, $alpha: 0.1); position: relative; } .quiz-question-number { text-align: center; font-size: 26px; font-weight: bold; border-bottom: 1px solid #222; padding: 20px; } .quiz-question { font-size: 32px; font-weight: bold; line-height: 1.8; margin-bottom: 40px; position: relative; text-align: center; padding: 30px 200px 0px; } .quiz-answer { display: grid; position: relative; grid-template-columns: repeat(2, 1fr); gap: 20px; padding: 0 200px 100px; &::before { position: absolute; width: 200px; height: 200px; font-size: 200px; opacity: 0.7; top: -40px; left: 0; right: 0; margin: auto; font-weight: bold; line-height: 1; text-align: center; z-index: 2; pointer-events: none; } &.is-correct { .checked { background: #ffb3b3; } &::before { content: "〇"; color: #ffb3b3; opacity: 0.5; } } &.is-incorrect { .checked { background: #b3c7ff; } &::before { content: "×"; color: #b3c7ff; } } li { position: relative; label { color: #222; display: block; margin: 0 auto; height: 60px; display: flex; align-items: center; width: 100%; padding: 4px 20px 4px 80px; font-weight: bold; font-size: 18px; line-height: 1.16; position: relative; transition: 0.3s ease-in-out; border: 1px solid #000; white-space: pre-wrap; &:hover { background-color: rgba(0, 0, 0, 0.1); } &.is-checked { pointer-events: none; } } &::after { position: absolute; text-align: center; font-size: 20px; font-weight: bold; content: ""; width: 60px; height: 40px; display: flex; align-items: center; justify-content: center; top: 0; bottom: 0; left: 0; margin: auto; z-index: 1; pointer-events: none; border-right: 1px solid #000; } &:nth-child(1)::after { content: "A"; } &:nth-child(2)::after { content: "B"; } &:nth-child(3)::after { content: "C"; } &:nth-child(4)::after { content: "D"; } } } .finish { display: none; text-align: center; position: absolute; width: 100%; height: 100%; top: 0; left: 0; align-items: center; justify-content: center; flex-direction: column; background-color: rgba($color: #000000, $alpha: 0.6); z-index: 3; &.is-show { display: flex; } .score-wrap { text-align: center; color: #fff; .score { font-size: 80px; font-weight: bold; } .ja { font-size: 34px; } .full { font-size: 24px; } } .goback-button { font-size: 14px; color: #fff; margin-top: 30px; display: inline-block; } } |
※スマホ用のscssは割愛しています。
1 2 3 4 5 6 7 8 9 10 11 12 13 14 15 16 17 18 19 20 21 22 23 24 25 26 27 28 29 30 31 32 33 34 35 36 37 38 39 40 41 42 43 44 45 46 47 48 49 50 51 52 53 54 55 56 57 58 59 60 61 62 63 64 65 66 67 68 69 70 71 72 73 74 75 76 77 78 79 80 81 82 83 84 85 86 87 88 89 90 91 92 93 94 95 96 97 98 99 100 101 102 103 104 105 106 107 108 109 110 111 112 113 114 115 116 117 118 119 120 121 122 123 124 125 126 127 128 129 130 131 132 133 134 135 136 137 138 139 140 141 142 143 144 145 146 147 148 149 150 151 152 153 154 155 156 157 158 159 160 161 162 163 164 165 166 167 168 169 170 171 172 173 174 175 176 177 178 179 180 181 182 183 184 185 186 187 188 189 190 191 192 193 194 195 196 197 198 199 200 201 202 203 204 205 206 207 | (function ($) { 'use strict'; //合計問題数 let $questionTotalNum = 5; /* ----------------------------------------------- 県庁所在地クイズ -------------------------------------------------- */ const prefecturalCapital = [ { id: "01", question: "北海道", answer01: "札幌", answer02: "福島", answer03: "前橋", answer04: "秋田", }, { id: "02", question: "青森県", answer01: "青森", answer02: "前橋", answer03: "秋田", answer04: "札幌", }, { id: "03", question: "岩手県", answer01: "盛岡", answer02: "福島", answer03: "仙台", answer04: "山形", }, { id: "04", question: "宮城県", answer01: "仙台", answer02: "札幌", answer03: "前橋", answer04: "水戸", }, { id: "05", question: "秋田県", answer01: "秋田", answer02: "盛岡", answer03: "青森", answer04: "札幌", }, ]; //質問をランダムにする function shuffleQuiz(array) { for (let i = (array.length - 1); 0 < i; i--) { let random = Math.floor(Math.random() * (i + 1)); let selected = array[i]; array[i] = array[random]; array[random] = selected; } return array; } let quizId = ["01", "02", "03", "04", "05"]; shuffleQuiz(quizId); //現在の質問数 let $currentNum = 0; //得点 let $pointPerCorrect = 10; let questionObject = (function () { let Obj = function ($target) { //質問の番号 this.$questionNumber = $target.find('.quiz-question-number'); //質問文 this.$questionName = $target.find('.quiz-question'); //選択肢ボタン this.$questionButton = $target.find('.quiz-button'); this.$button01 = $target.find('.button01'); this.$button02 = $target.find('.button02'); this.$button03 = $target.find('.button03'); this.$button04 = $target.find('.button04'); //選択肢のテキスト this.$answer01 = $target.find('.quiz-text01'); this.$answer02 = $target.find('.quiz-text02'); this.$answer03 = $target.find('.quiz-text03'); this.$answer04 = $target.find('.quiz-text04'); //score this.$score = $target.find('.score-wrap .score'); this.init(); }; Obj.prototype = { //初回設定 init: function () { //イベント登録 this.event(); }, event: function () { let _this = this; let score = 0; //ウインドウ読み込み時 $(window).on('load', function () { //value取得 let value = quizId[$currentNum]; //最初は0(1番目) //次の質問を取得 let nextQuestion = _this.searchQuestion(value); //次の質問に切り替える _this.changeQuestion(nextQuestion); //回答のシャッフル _this.shuffleAnswer($('.quiz-answer')); }); //button クリック this.$questionButton.on("click", function () { if ($(this).hasClass('button01')) { $(this).parents('.quiz-answer').addClass('is-correct'); score = score + $pointPerCorrect; } else { $(this).parents('.quiz-answer').addClass('is-incorrect'); } $(this).addClass('is-checked'); if ($currentNum + 1 == $questionTotalNum) { setTimeout(function () { $('.finish').addClass('is-show'); $('.score-wrap .score').text(score); }, 1000); } else { setTimeout(function () { //現在の数字の更新 $currentNum = $currentNum + 1; //次の質問番号を取得 let value = quizId[$currentNum]; //次の質問を取得 let nextQuestion = _this.searchQuestion(value); //次の質問に切り替える _this.changeQuestion(nextQuestion); //クラスを取る _this.$questionButton.removeClass('is-checked'); $('.quiz-answer').removeClass('is-correct').removeClass('is-incorrect'); //回答のシャッフル _this.shuffleAnswer($('.quiz-answer')); }, 1000); } return false; }); }, searchQuestion: function (questionId) { let nextQuestion = null; prefecturalCapital.forEach(function (item) { if (item.id == questionId) { nextQuestion = item; } }); return nextQuestion; }, changeQuestion: function (nextQuestion) { let _this = this; //質問文の入れ替え _this.$questionName.text(nextQuestion.question + 'の県庁所在地は?'); //質問番号を1つ増やす let numPlusOne = $currentNum + 1; _this.$questionNumber.text('質問' + numPlusOne); //選択肢のテキストの入れ替え _this.$answer01.text(nextQuestion.answer01); _this.$answer02.text(nextQuestion.answer02); _this.$answer03.text(nextQuestion.answer03); _this.$answer04.text(nextQuestion.answer04); }, shuffleAnswer: function (container) { let content = container.find("> *"); let total = content.length; content.each(function () { content.eq(Math.floor(Math.random() * total)).prependTo(container); }); }, }; return Obj; })(); let quiz = $('.quiz'); if (quiz[0]) { let queInstance = new questionObject(quiz); } })(jQuery); |
まとめ
今回は4択クイズにしましたが、選択肢を増やしたり2択にして〇×クイズにする、というアレンジも簡単におこなえるソースになっているかと思います。
1ページ内で完結するとてもシンプルな作りではありますが、結果ページやSNSシェアを設けたりすることでより充実したコンテンツに変えられると思います。また、記事内では文字を差し替える .text() を紹介しましたが、他にも画像やCSSをjQueryで動的に変えることができます。問題によって画像を出し分けたり、より動きの多いアニメーションをつけたりすることも可能なので、今回紹介したクイズをベースにあなただけのオリジナルを作っていただければ幸いです。
参考にしたサイト
配列の要素の並びをシャッフルする
jQueryで要素をシャッフル。
